The Raspberry Pi computers are an amazing series of low-cost computers perfect for every aspiring and seasoned hacker. One of the features that I absolutely love about the Raspberry Pi is the GPIO pins that allow me to interface it with electronic projects.
In this article, I will give a simple starter guide on how to manipulate the GPIO pins to control LEDs. Even though controlling a LED is not that exciting, the same principle can be used to control relays and send signals to Arduino projects and other gizmos.
The goal of this article is to encourage you to try it for yourself, and hopefully, it will inspire you to make wonderful and fun IoT projects.
Setup
The easiest way to create electronic projects with the Raspberry Pi is to create scipts in Scratch or with the python library gpiozero. This library comes preinstalled on Raspberry Pi OS. Make sure the gpiozero library is installed by trying to installing it with this command:
sudo apt install python3-gpiozero python3-pigpioTo be able to controll the GPIO pins in scripts and other programs I have experienced that you must enable "Remote GPIO" in the raspberry pi configuration or in the terminal program rapsi-config.
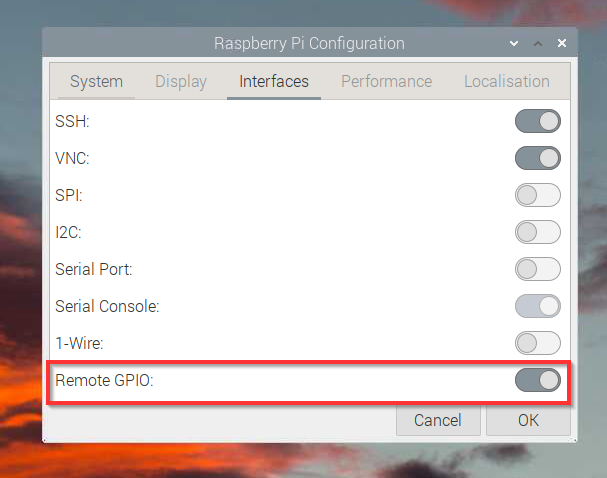
Enable Remote GPIO i Raspbery Pi Configuration
To enable Remote GPIO via a terminal interface run this command:
sudo raspi-configSelect: 3 Interface options by using the arrow keys, and enter key to open the submenu. Then select: I8 Remote GPIO. Finally chose "Yes" to enable it.

Enable Remote GPIO via a terminal emulator.
Reboot the Raspberry Pi to apply the changes.
The GPIO functionality is provided by a special daemon. Enable it to start when the Raspberry Pi boots, and to start the daemon - run these commands:
sudo systemctl enable pigpiod
sudo systemctl start pigpiod
Python Script
To test the functionality of the gpiozero library, you can write a simple python script.
vim ledTest.py#!/usr/bin/python3
from gpiozero import LED
from time import sleep
led = LED(18)
led.on()
sleep(2)The script starts by importing the two classes we need to run this script.
The gpiozero LED class makes it super simple to define a GPIO pin as an output, and write that output as high or low, using easy-to-read syntax. To write the output as high, run the on() method, and to write the output to low, run the off() method.
Note that when the script stops the GPIO pin will go low, and as a result, the LED will turn off. To make it possible to see that the LED is turned on by the python script we need to import and run the sleep() method for two seconds.
This is essentially how GPIO projects on the Raspberry Pi function. GPIO pins are only in use when they are controlled by a program. When the program that is controlling the GPIO pins stops everything returns to a zero state.
In other words, every GPIO pin is written low when the program that was controlling them stops.
Flask API
A simple web API using the Flask framework
With the Raspberry Pi, it's relatively easy to create advanced web APIs, effectively turning it into a custom IoT (Internet of Things) device.
The Raspberry Pi OS comes with everything needed for this project preinstalled, you just need to create two files.
firs we create a file containing the environment variables needed to run Flask.
vim .flaskenvFLASK_APP=app.py
FLASK_RUN_HOST=0.0.0.0
FLASK_RUN_PORT=8080This defines that the script containing the code for our application is called app.py, and that it can be reached by everyone that can connect to our Raspberry Pi.
Lastly, it defines what port it should be listening for HTTP requests on. The default port for flask is port 5000.
Now you can create a python script for the API.
vim app.py#!/usr/bin/python3
from flask import Flask, jsonify
from gpiozero import LED
app = Flask(__name__)
led = LED(18)
@app.route('/1')
def onLed():
led.on()
return jsonify(ledState=1)
@app.route('/0')
def offLed():
led.off()
return jsonify(ledState=0)This is our entire application. The script starts with a library import of the two Flask framework classes we need and the LED class from the gpiozero library.
To start the Flask application, run this command:
flask run
 * Serving Flask app "app.py"
 * Environment: production
   WARNING: This is a development server. Do not use it in a production deployment.
   Use a production WSGI server instead.
 * Debug mode: off
 * Running on http://0.0.0.0:8080/ (Press CTRL+C to quit)
When the application is running the http://<ip-address>/1 route will turn a JSON object showing the status of our led.
curl -s http://localhost:8080/1
{"ledState":1}
Because the GPIO pin is controlled by the Flask web application the status of the LED will stay the same as long as Flask is running. To turn the LED off just "GET" the /0 route.
curl -s http://localhost:8080/0
{"ledState":0}
Congratulations! You now have the foundational knowledge to go nuts and create your own projects. Have fun!