Since the original PlayStation uses a CD-ROM for its games, the system is prone to all problems associated with old CD-ROM drives and CD-ROMs. The PlayStation will struggle to read data from the CD-ROMs as it ages, and the laser in the CD-ROM drive deteriorates.
The PSIO from Cybdyn solves this issue by emulating data read from the CD-ROM. This allows you to store your entire game collection on an SD card, enabling you to enjoy it without the hassle of switching disks. If you use an upscaler through RGB cables, you can also play most games from other game regions, which would typically require a modchip to be played from disk. A final benefit, and my motivation for purchasing the PSIO, is that it significantly simplifies the process of running homebrew games on original hardware.
In essence, the PSIO provides a comparable experience to what you might be accustomed to from flash cartridges, such as the EverDrive cartridges from Krikzz, except that save states are not supported.
In this article, I will review the PSIO, explain how it is installed and used, outline its limitations, and offer suggestions on how to maximize its potential based on my experience.
The purchase experience
From order to delivery
I bought the PSIO from Cybdyn in late September 2023. More than one year later, in late January 2025, the package was finally shipped to Norway. Since Cybdyne never responded to any emails or support tickets I created, in which I had inquired about the status of my order, I had accepted my fate as a scam victim and moved on with my life. I was therefore pleasantly surprised when the notification email with tracking was sent to my email. The package arrived in my mailbox a couple of weeks later. When it arrived, I was pleased by the good shipping and product packaging.
Many have been vocal about the poor customer service from Cybdyn on the internet, and I have to warn others. This is a rare occasion where I feel that "the Internet" has not exaggerated the poor customer service provided.
I have never experienced worse customer service from sales representatives in any company throughout my entire life. The only available information I was given was a short news message on their official website in January 2024 stating that "PSIO Cartridges have started to be shipped. We ask that you please be patient with us as we process your order." Link to news page. As mentioned earlier, it was shipped to me a whole year later.
Needless to say. The purchase process required considerable patience.
Installation
Installing the PSIO switchboard
To make the PSIO work, a switching circuit must be installed on the PlayStation system. This circuit enables the PSIO to hook into the datastream from the CD-ROM when it's running, and to use the CD-ROM as usual when the PSIO is disconnected or disabled. Cybdyne provides excellent documentation for the installation process for each PlayStation motherboard version. I spent around one hour installing the switching circuit on my PlayStation.
I have a modchip installed on my PlayStation, enabling me to play burned CD-ROM backups, homebrew, and NTSC games on my PAL console. The PSIO works perfectly in combination with a modchip.
The installation required me to cut two (2) circuit traces on the motherboard, and solder nine (9) wires. Because I'm confident with my soldering experience, and the provided installation documentation was detailed, had great pictures, and was easy to understand, I had no problem completing the installation in under an hour.
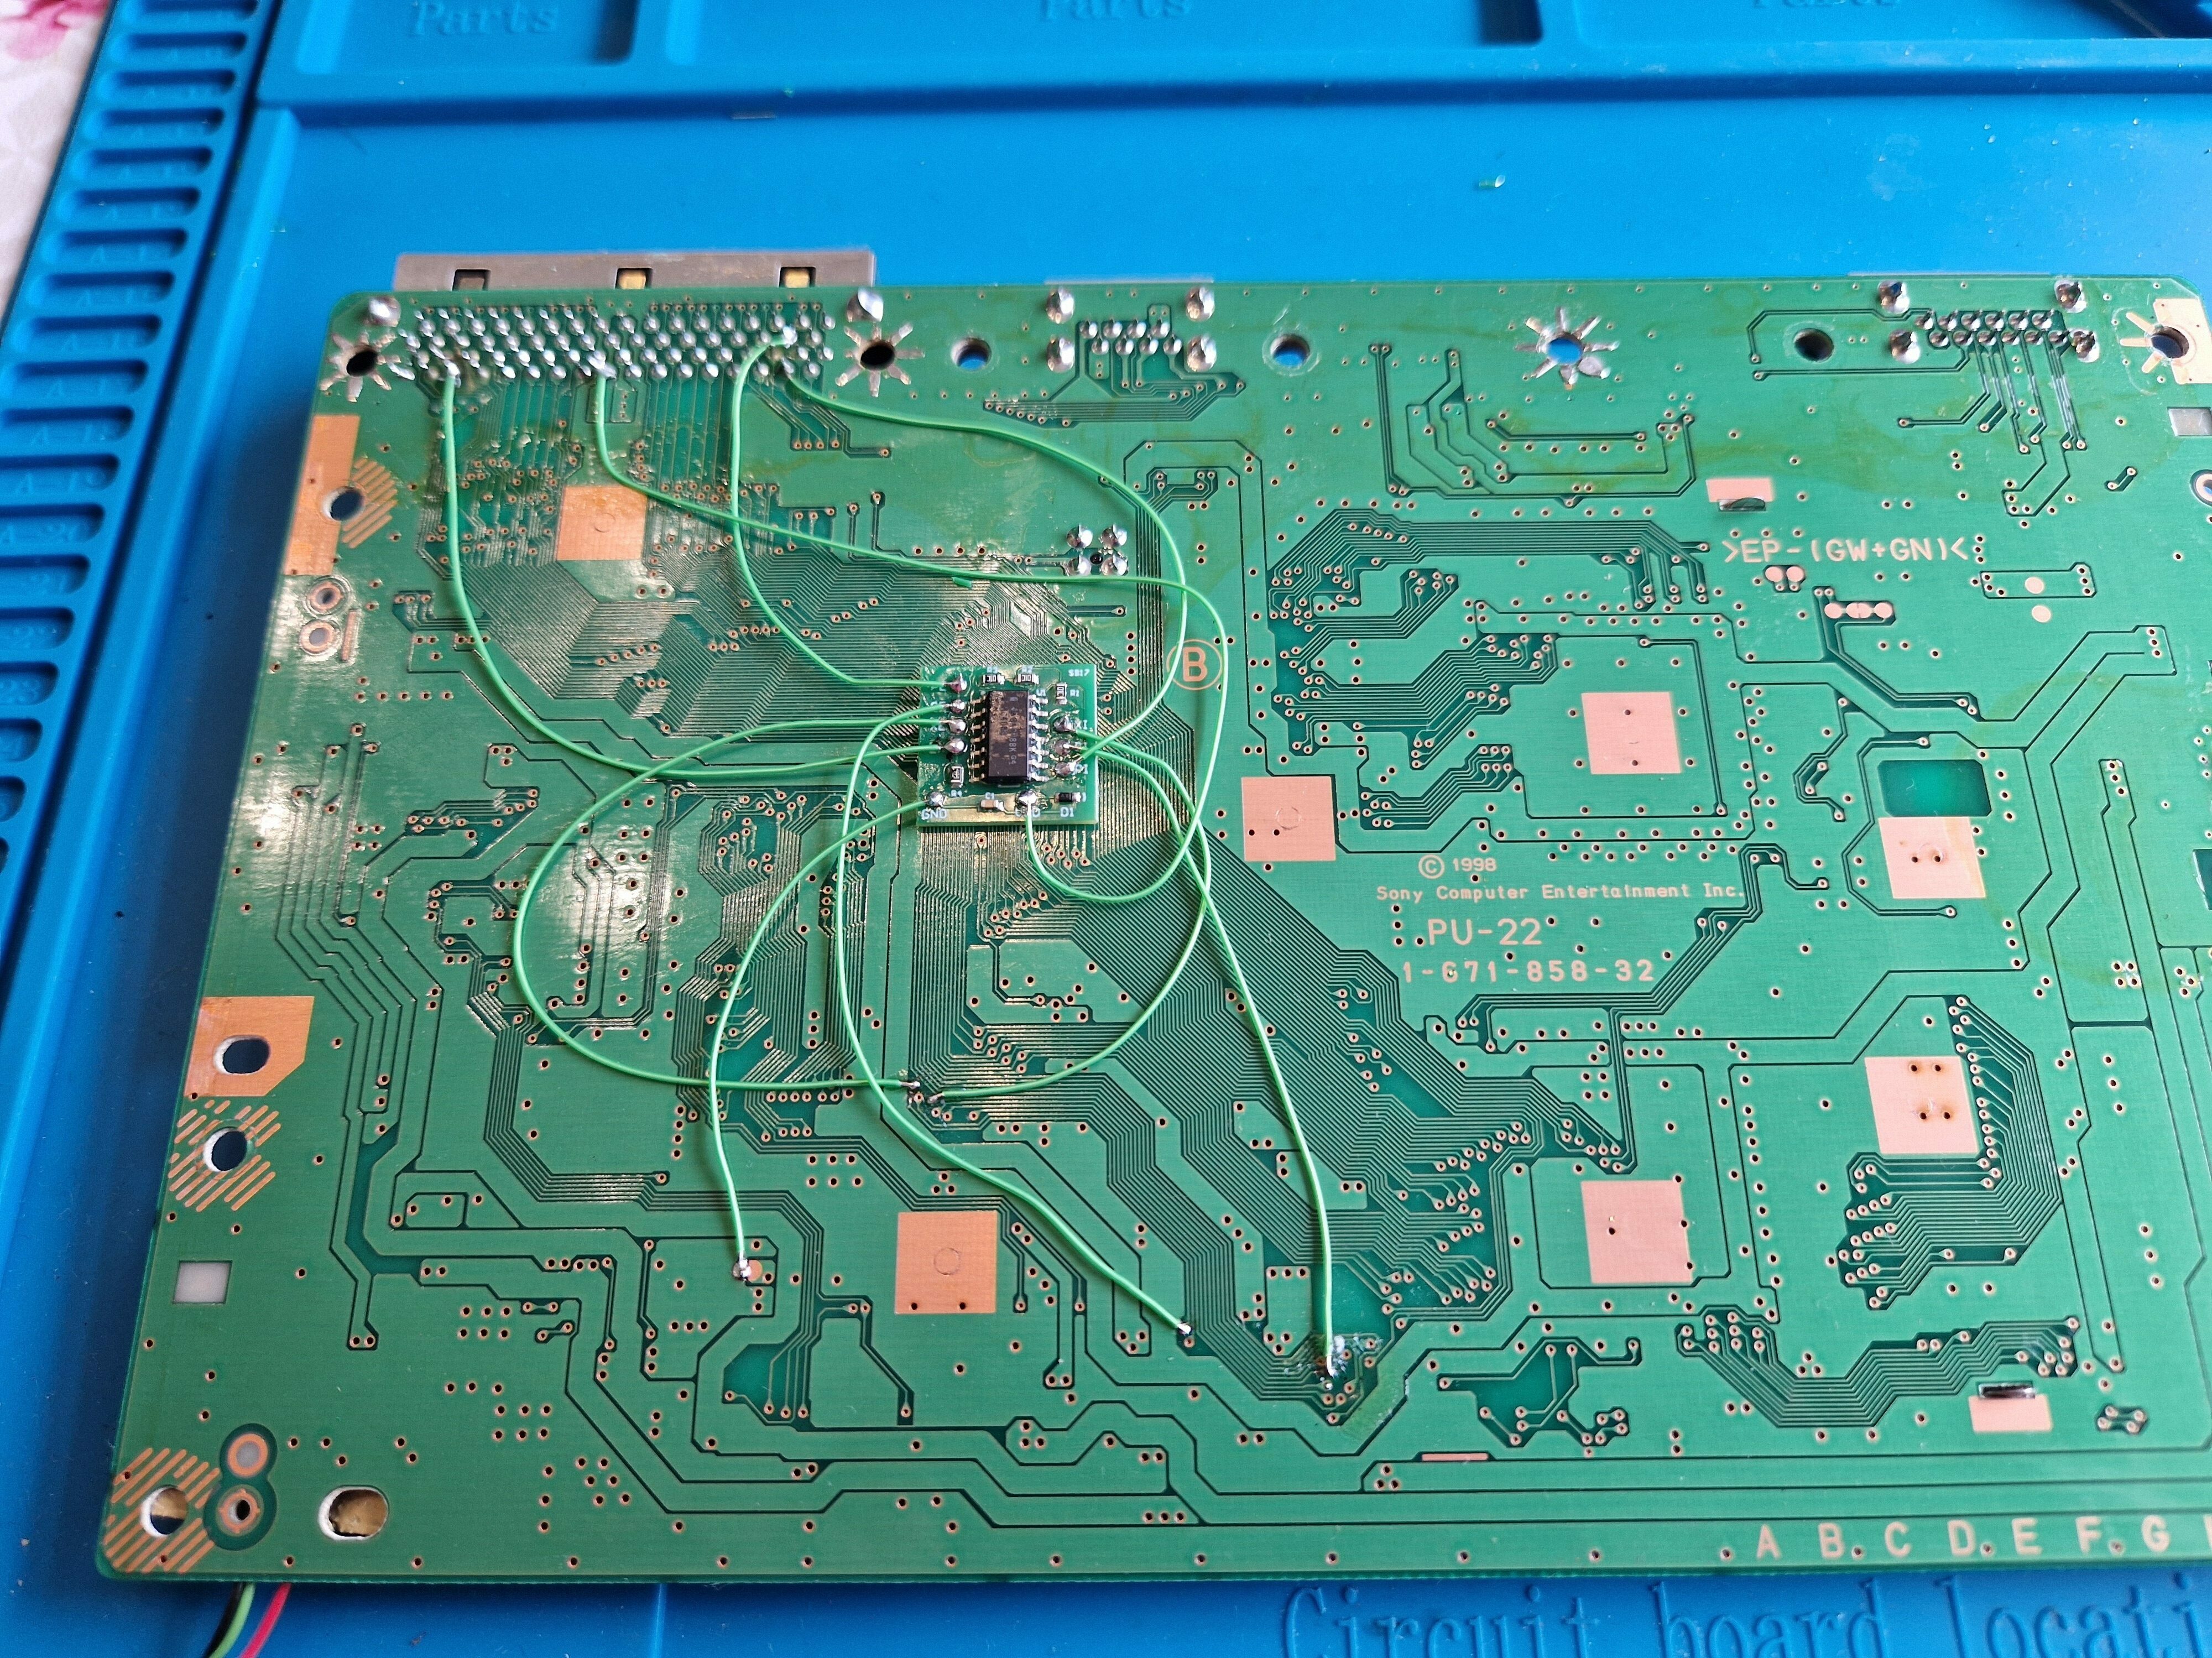
The PSIO switchboard installed on a PU-22 motherboard
Image © Stanley Skarshaug
When the installation was completed, I assembled the PlayStation and tested it with a CD-ROM without the PSIO inserted into the serial port. Once I had verified that the console worked as expected without the PSIO inserted, I continued by verifying that the system could boot with the PSIO inserted into the serial port. Satisfied with a successful switchboard installation, continued with the initial setup of the PSIO.
Initial setup
Installing and anabling the firmware
The PSIO is an FPGA device that comes without a proper firmware installed. To install it, I followed the instructions provided in the excellent and detailed user manual. In summary, the steps were like this:
- The SD card intended for use with the PSIO was formatted to exFAT
- I signed in to the Cybdyn website and activated my product.
- Once the product was activated, I was able to download the Menu System.
- The Menu System was placed in the root of the SD card.
- The SD card was inserted into the PSIO, and the PlayStation was booted.
- The setup process was initiated, and after a few reboots, I received an error message indicating that a "RESP.ENC" file was missing.
- I powered off the PlayStation, pulled out the SD card, and inserted it into my computer.
- On the product activation webpage, I had to upload a file called "CHAL.ENC" that the PSIO setup had created in the root directory of the SD card.
- Once processed, I was able to download the "RESP.ENC" file and place it in the root of the SD card.
- The SD card was inserted into the PSIO, and the PlayStation was booted, and ready to be used for gaming.
From start to finish, I think the process took around 15-20 minutes. Whenever I had to perform an action, such as pressing a button or restarting the console, the PSIO setup provided me with clear and easy-to-understand instructions. I was never worried about doing something wrong, and risking bricking my PSIO.
Adding games
Making the PSIO work its magic
Adding games to the PSIO, is not as simple as adding games to the SD card of an EverDrive flash cartridge for other retro consoles.
On the PSIO, each game should be placed into its own directory in the root of the SD card. The PSIO does not support nested directories. This means that you cannot organize your games in subdirectories. Inside the game directory, you store all the game's assets.
For single-disk games, place the .bin and .cue/.cu2 file, or the .iso file of the game, in the directory, and Menu System will recognize the game and its correct region.
Unlike emulators, the PSIO will not accept games with just a .bin file. You will need the corresponding .cue file. If you are missing the .cue file for your game, you can easily generate it using the web-based cue maker from DuckStation.
The PSIO cannot work with game backups in the format of separate .bin files for each CD track. Thankfully, the downloadable "Cybdyn systems - PSIO Systems Console" application for Windows has the functionality to combine all the .bin files into a single large .bin file and a new corresponding .cu2 file. However, for this tool to work, you must have a .cue file for the backup. If you are missing a .cue file for your multi-bin backup, the cue-maker tool from DuckStation can also be used to create a .cue file for a multi-bin backup.
LibCrypt
Copy protection og games
Some games like Resident Evil 3 (PAL) and V-rally 2 are protected by LibCrypt and will get stuck at loading screens. To remove LibCrypt, you must use a patcher tool like the LibCrypt Patcher.
Multi-disc games
The PSIO allows for games with multiple disks. To make this work, you have to make a file in the game directory called "MULTIDISC.LST". This file must include an ordered list of all game disk image files. These file names can point to images located inside the games directory using a relative path or outside it. If the disk images are in the .bin/.cue format, you must enter the path of the .bin file. Path/filenames in the MULTIDISC.LST file must be 100% correct, and cannot contain any blank lines.
Below is my MULTIDISC.LST for Metal Gear Solid using relative paths.
Metal Gear Solid (Europe) (Disc 1).bin
Metal Gear Solid (Europe) (Disc 2).bin
Expansion pack games, such as Metal Gear Solid - Special Missions, will require one of the original Metal Gear Solid disks to boot. Using absolute paths to disk 1 of Metal Gear Solid in my MULTIDISK.LST, I was able to make the disk checking work for the Metal Gear Solid - Special Missions, without having one copy of the same disk image in two game directories.
Below is my MULTIDISC.LST for Metal Gear Solid - Special Missions using absolute paths.
/Metal Gear Solid - Special Missions [PAL]/Metal Gear Solid - Special Missions (Europe).bin
/Metal Gear Solid [PAL]/Metal Gear Solid (Europe) (Disc 1).bin
You cannot specify which game disk to insert using an in-game menu; instead, you change to the next disk in the MULTIDISC.LST file by ejecting the SD card, and then re-inserting it. If you are currently using the last disk, you will loop back to the first disk when doing this.
The process to switch to the next disk is like this:
- You will be prompted to change the disc in-game.
- Press on the SD card, to make it eject from the PSIO.
- Wait 2 seconds.
- Press on the CD card, to re-insert it into the PSIO.
- Wait for the game to register a disk change or press a button when prompted in-game.
Not all games are compatible with disk swapping on the PSIO. For example, I found that it did not work for the PAL version of "In Cold Blood". Thankfully, all games I own allow me to save game progress as part of the process of changing disks.
Cover images
To add cover images to your games, you must create an 80x84 pixel 24-bit BMP image and place it inside the game directory. The cover image can be named anything, but it must be the only file in the directory with the .bmp file extension inside the game directory.
The process I used to create cover images was the following:
- Get a high-quality cover image from the web.
- Use simpleimageresizer.com to resize the image to a width of 80 pixels
- Open the resized image in MS Paint.
- Extend the image to the correct height and fill the new white area with black.
- Saving the image as a 24-bit BMP file.
- Moving the newly created BMP cover image to the game directory on the SD card.
The PSIO firmware is very picky about both image size, format, and extension. This must be correct for the cover image to show in the Menu System when you have selected the game.
Sometimes, a bug in the Menu system causes the cover image to not load. I found that it will load by closing the game pop-up, and selecting the game again.
Issues and bugs
Some not so great experiences
After using the PSIO for a week for daily gaming and adding new games to the SD card, I encountered a bug where many game directories would not appear in the menu system. No files were lost or appeared to be corrupted on the SD card. They would simply not be listed in the Menu system.
The issue was resolved by copying the games to my computer, formatting the SD card, and then copying the games back to the SD card. Due to the slow transfer speed to the SD card, this experience led me to stop storing my entire game library on the SD card and instead copy the games I was currently playing to it. This is a shame, as I had hoped to use the PSIO to completely airgap the PlayStation from the rest of my computers, making it a self-contained system purely for retro gaming on original hardware.
Another issue I face from time to time is that the cover art for the games does not display in the Menu System. By closing the game launch menu and selecting the game again, the cover art will show. This has not affected how the game is played when launched.
Debugging
(Hopfully) gaining access to the good stuff!
On the PSIO, there is a mini-USB port that (hopefully) in the future will allow you to connect the PSIO to your computer. This port will then enable you to debug programs running on the PlayStation via a serial connection. If you are a homebrew developer, or ROM hacker, this could potentially be a fantastic tool. Unfortunately, it's currently not implemented in the firmware.
Timing issues
GPU speed issues when playing games from other regions
Most games play great from the PSIO regardless of region (PAL/NTSC). PAL games will run at 50/25 FPS, and NTSC games will run at 60/30 FPS. Both will have the correct resolutions and colors when using RGB cables.
However, it should be noted that the GPU's clock speed is slightly inaccurate when playing an NTSC game on a PAL console, and when playing PAL games on an NTSC console. This is rarely noticeable unless you are speedrunning with precision timers or playing rhythm games that require timing based on audio cues.
To fix the timing issue, a DFO (Dual-Output Frequency Oscillator) or MFO/MOFO (Multi-Output Frequency Oscillator) mod must be installed on the PlayStation.
Conclusion
Do I recommend the PSIO for others?
Yes, and no. I think the customer support during purchase and shipping from Cybdyn was horrible. I hope nobody has to endure the same waiting I did for my unit to arrive. At the same time, I love my PSIO, and I'm very pleased with the actual product.
It is a hassle to add new games to the SD card, but once added, the PSIO is a fantastic and convenient tool that allows me (in theory) to have my entire game library "on" the PlayStation, without needing to insert disks.
And as a programmer, it enables me to quickly test my creations without having to burn them to a CD-ROM for each revision or test run. This makes developing homebrew for the PlayStation easier and more fun.