Windows 10 has a lot of useful features that are GUI based, but in my experience, the Disk Management utility is not the best tool for formatting thumb drives and other types of flash storage. PowerShell on the other hand has a couple of nice tools to get the job done in just a few lines of commands.
In this guide, I will guide you through the process of partitioning and formating a HP x755w thumb drive.
Start PowerShell
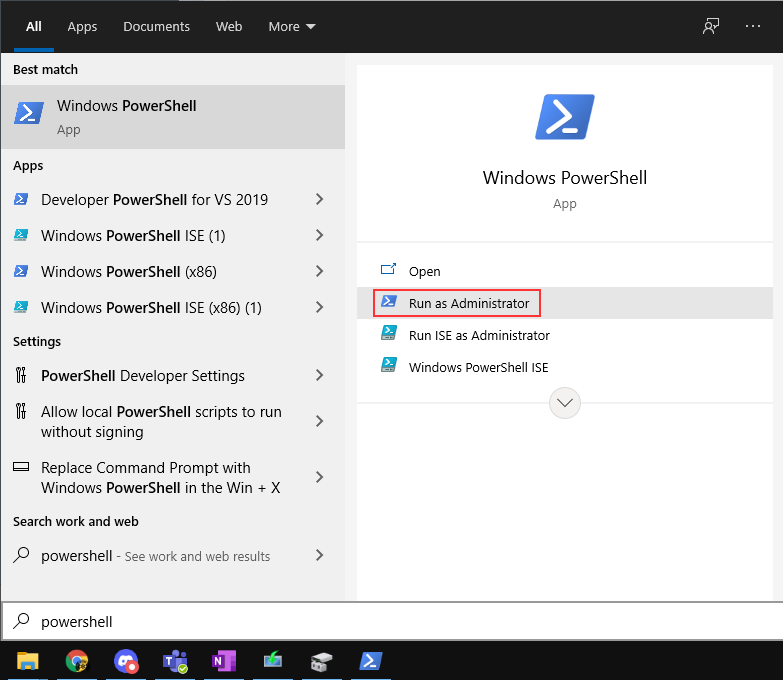
To make use of the tools we need PowerShell has to be run as an administrator. Press the Windows key on your keyboard, and start to type PowerShell. On the right side of your start many the option to run PowerShell as Administrator will appear.

Screenshot from the Start menu, and where you can click to launch PowerShell as administrator
Accept the prompt to run the PowerShell session as Administrator, and you are ready to use PowerShell with unlimited powers.
List all attached disks
Before you can use the partition and format tools you must know what the drive ID is. To list all attached derived use the Get-Disk commandlet.
Get-Disk

Number Friendly N Serial Number                    HealthStatus         OperationalStatus      Total Size Partition
       ame                                                                                                Style
------ ---------- -------------                    ------------         -----------------      ---------- ----------
0      WDC WDS... 1913_7880_4157_0001_001B_448B... Healthy              Online                  465.76 GB MBR
1      WDC  WD... 19431F802821                     Healthy              Online                  465.76 GB MBR
3      WDC WD2...      WD-WCAZAF485718             Healthy              Online                    1.82 TB MBR
2      WDC WDS... 183602A02A71                     Healthy              Online                  931.51 GB MBR
4      Generic... 058F63626470                     Healthy              No Media                      0 B RAW
6      Generic... 058F63626472                     Healthy              No Media                      0 B RAW
5      Generic... 058F63626471                     Healthy              No Media                      0 B RAW
7      Generic... 058F63626473                     Healthy              No Media                      0 B RAW
8      hp x755w   AA00000000000489                 Healthy              Online                   28.91 GB MBR
From the terminal dump above we can see that the HP x755w thumb drive is drive number 8. We will use this number when partitioning and formatting the drive.
Remove partitions
The first step is to remove everything from the thumb drive, including partition tables. I have used this thumb drive as a bootable drive to install a Linux distribution, so in order to make it into a normal and functioning thumb drive, I have to remove the partition table. This is done using the Clear-Disk commandlet.
Clear-Disk -Number 8 -RemoveData

Confirm
Are you sure you want to perform this action?
This will erase all data on disk 8 "hp x755w".
[Y] Yes  [A] Yes to All  [N] No  [L] No to All  [S] Suspend  [?] Help (default is "Y"): Y
Now that the drive is unpartitioned, we can proceed to partition the drive.
Partition and formating
Before a filesystem can be added to the drive it has to have at least a single partition. To create a partition that uses all the physical space on the thumb drive we use the New-Partition commandlet piped into the Format-Volume commandlet.
In PowerShell the Format-volume commandlet cannot be used on its own, it has to be used in conjunction with the New-Partition commandlet. In this example, I formatted the partition with the FAT filesystem because I will use the thumb drive on both Linux and Windows operating systems.
New-Partition -DiskNumber 8 -UseMaximumSize | Format-Volume -FileSystem FAT

DriveLetter FriendlyName FileSystemType DriveType HealthStatus OperationalStatus SizeRemaining     Size
----------- ------------ -------------- --------- ------------ ----------------- -------------     ----
                         FAT           Removable Healthy      OK                     28.84 GB 28.91 GB
After a short period of work, the partition is created, and the new filesystem was created on the new partition.
Congratulations, the thumb drive should now appear as a normal USB storage device in "My Computer".🎉