Sometimes you just want to hide your network behind another computer, or perhaps you want a wired network for your home, but can only connect to the internet via your landlord's WiFi? There are many reasons why you might want to create a NAT (Network Address Translation) Network. In this guide, I hope to help you reach your goal.
Topography
Overview of the networks
In this guide, I will use Oracle VirtualBox to demonstrate the process since it's easy to build virtual networks on virtual machines there.
We will have two networks in this setup. One that is the public (outside network), and one that is the NAT'ed private network.
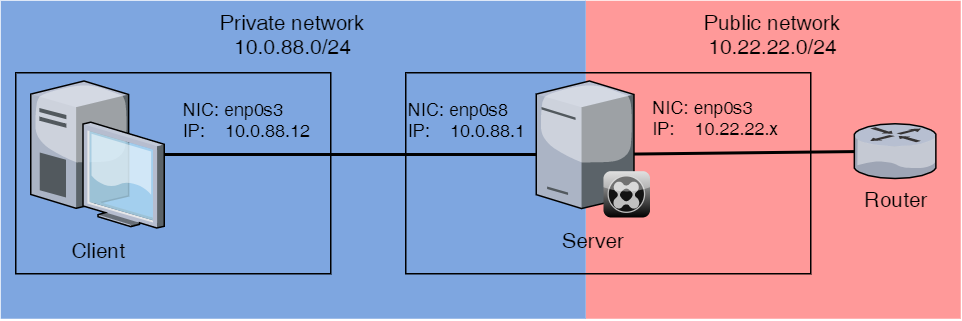
Topgraphy of the network
Functioning as the NAT Router I will use a computer with Ubuntu 20.04, but any Debian-based Linux distro with UFW (Uncomplicated Firewall) will be similar. This computer I will from now on call the server, since it will serve network to the computers in the private network. In many instances, I have used an old laptop for this purpose.
VirtualBox network setup
The server needs two network cards, one for the private network, and one for the public network. For the NAT'ed network, I will create a Host-only network in Virtualbox. This is done by opening the VirtualBox Manager, click on "File", then click on "Host Network Manager..."

Open the Virtualbox Managers Host Network Manager
Create a new Host-only Ethernet adapter. In my example, it will be called "VirtualBox Host-Only Ethernet Adapter #3". Uncheck the box for the DHCP server, since we don't want that functionality.
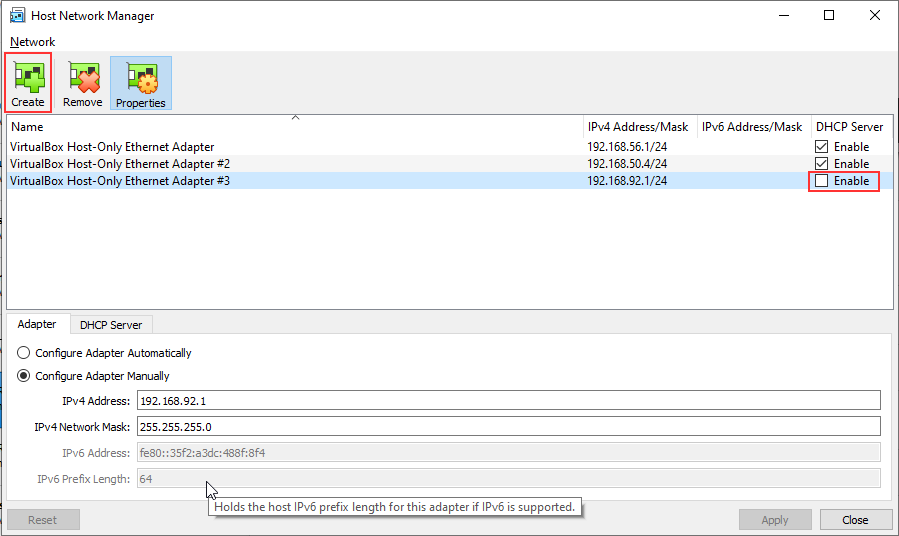
Create a new Host-only Ethernet adapter, and disable the DHCP server
We can now configure the Server to have two NIC, One using the a bridged adapter, and another "VirtualBox Host-Only Ethernet Adapter #3".
Control that the first NIC is set to Bridged Adapter:
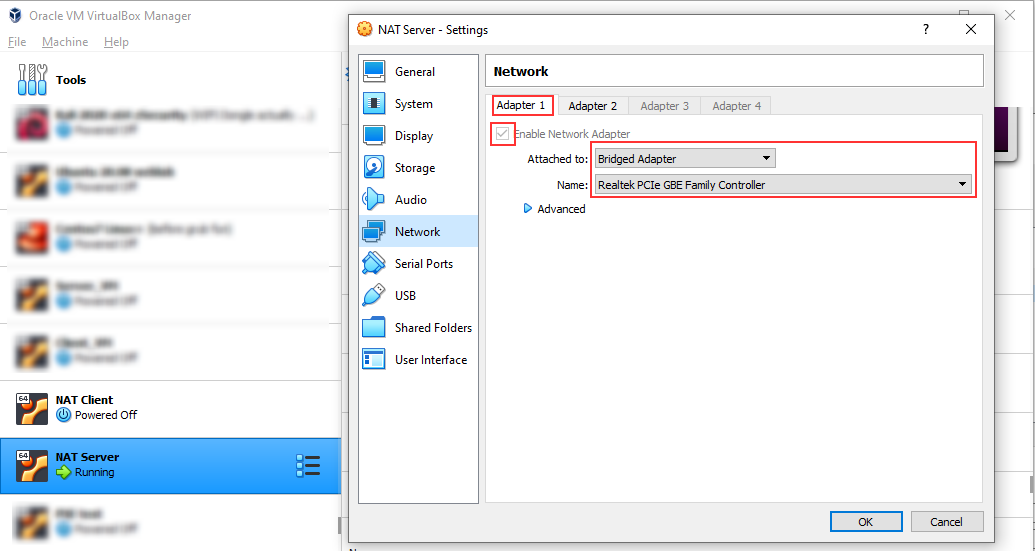
Server NIC 1 - Bridged adapter
Enable "Adapter 2" and set it to Host-Only, and select the network "VirtualBox Host-Only Ethernet Adapter #3".

Server NIC 2 - Host-Only adapter
On the client, you just need one NIC. Set that to Host-Only, and select the network "VirtualBox Host-Only Ethernet Adapter #3".
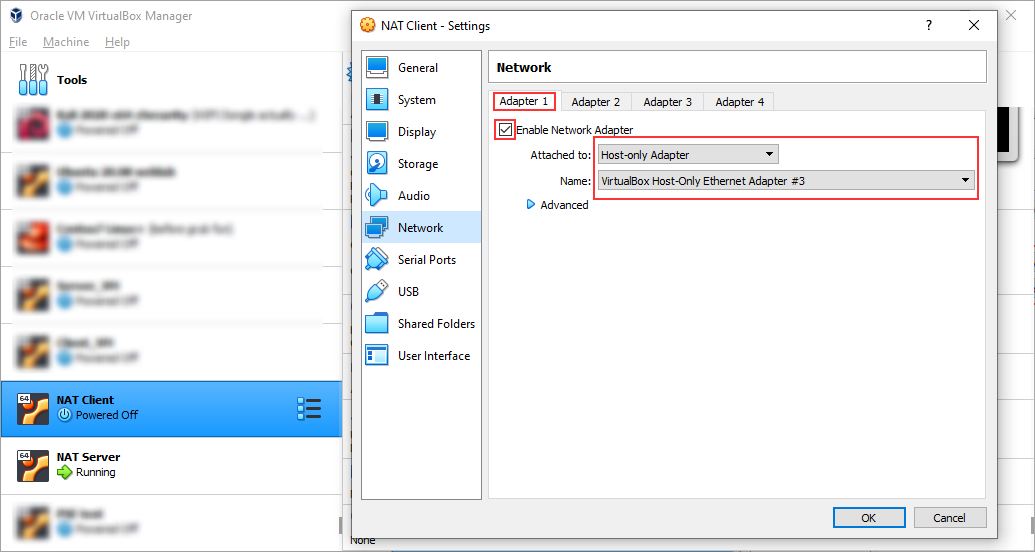
Client computer - Host-Only adapter
Now the virtual networking wiring is done, and we can continue with the fun stuff.
Server network setup
We are gonna keep it simple and just add a static IP to the network card that is connected to the private network
sudo vim /etc/netplan/01-network-manager-all.yaml# enp0s8 is the NIC connected to the private network
# all other NICs will be managed by NetworkManager
network:
ethernets:
enp0s8:
addresses: [10.0.88.1/24]
version: 2
renderer: NetworkManagerTo apply the changes run:
sudo netplan applyRouter setup
To make the server function as a router you need a to set a couple of firewall rules: start by setting the default forward policy to "ACCEPT".
sudo vim /etc/default/ufw...
# Uncomment this to allow this host to route packets between interfaces
net/ipv4/ip_forward=1 #<---------------------- UNCOMMENT!!!!
#net/ipv6/conf/default/forwarding=1
#net/ipv6/conf/all/forwarding=1
...Next up is to allow for routing of packet between your network cards, effectively making the computer into a router.
sudo vim /etc/ufw/systctl.conf...
# Uncomment this to allow this host to route packets between interfaces
net/ipv4/ip_forward=1 #<------------------------ UNCOMMENT!!!!
#net/ipv6/conf/default/forwarding=1
#net/ipv6/conf/all/forwarding=1
...Next up is to add the firewall rules that will mascarade the traffic on your private network, so it on the public network looks like it's coming from the server. Add the following lines of code to the very top of the file, just below the block of comments.
sudo vim /etc/ufw/before.rules...
# nat Table rules
*nat
:POSTROUTING ACCEPT [0:0]
# Forward traffic from eth1 through eth0.
-A POSTROUTING -s 10.0.88.0/24 -o enp0s8 -j MASQUERADE
# don't delete the 'COMMIT' line or these nat table rules won't be processed
COMMIT
...Now we need to apply the new firewall rules by restarting ufw
sudo ufw reloadNow that you have a functioning NAT router, you can add other network functionalities such as a DHCP server and a DNS server.
Client setup
Manual network setup
If you have set up a DHCP server you can skip this step.
Edit the network configuration file:
sudo vim /etc/netplan/01-network-manager-all.yaml# enp0s3 is connected to the private network and will use the server as a router
network:
ethernets:
enp0s3:
addresses: [10.0.88.12/24]
gateway4: 10.0.88.1
nameservers:
addresses: [8.8.8.8,8.8.4.4]
version: 2
renderer: NetworkManagerApply the network configuration
sudo netplan applyIf everything was set correctly you will now be able to reach the internet via the server. Test it out
ping -c 2 www.skarshaugs.no
PING www.skarshaugs.no (192.46.233.165) 56(84) bytes of data.
64 bytes from li2176-165.members.linode.com (192.46.233.165): icmp_seq=1 ttl=50 time=47.5 ms
64 bytes from li2176-165.members.linode.com (192.46.233.165): icmp_seq=2 ttl=50 time=46.4 ms

--- www.skarshaugs.no ping statistics ---
2 packets transmitted, 2 received, 0% packet loss, time 1002ms
rtt min/avg/max/mdev = 46.369/46.914/47.460/0.545 ms
traceroute 10.22.22.1
traceroute to 10.22.22.1 (10.22.22.1), 30 hops max, 60 byte packets
1 _gateway (10.0.88.1) 5.657 ms 5.371 ms 0.465 ms
2 10.22.22.1 (10.22.22.1) 3.271 ms 2.987 ms 3.147 msAs you can see from the terminal dump from above the router is working as intended.
Congratulations, you have now a fully functional NAT router!
Credits:
Inspiration for this guide came from: www.networkreverse.com and the securitynetworkinglinux.wordpress.com