Storing assets for web projects in S3-compatible buckets improves the scalability of web-based apps dramatically compared to conventional storage. Linode/Akamai provides an easy-to-use solution dubbed "object storage."
In this article, I will provide a simple, quick-start guide on how to use the service while keeping risk at a minimum.
Install s3cmd
Working faster and automate through the cli
Because Linodes Object Storage service is S3 compatible, you can use their terminal to s3cmd. This python based tool can be installed through the pip with this command:
pip install s3cmdCreate S3 Access Key
Once s3cmd is installed you must create an access key in the Linode/Akamai that can be used to manage all your object storage buckets.
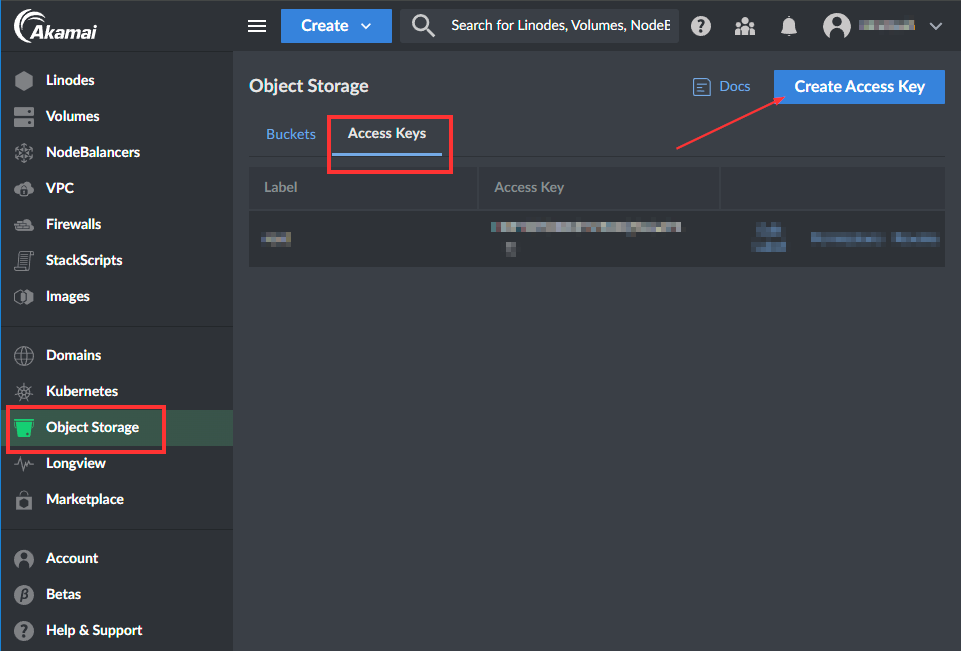
Navigate into the "Object Storage" section, click on the "Access Keys" tab, and then on the "Create Access Key" button

Access the Create Access Key blade
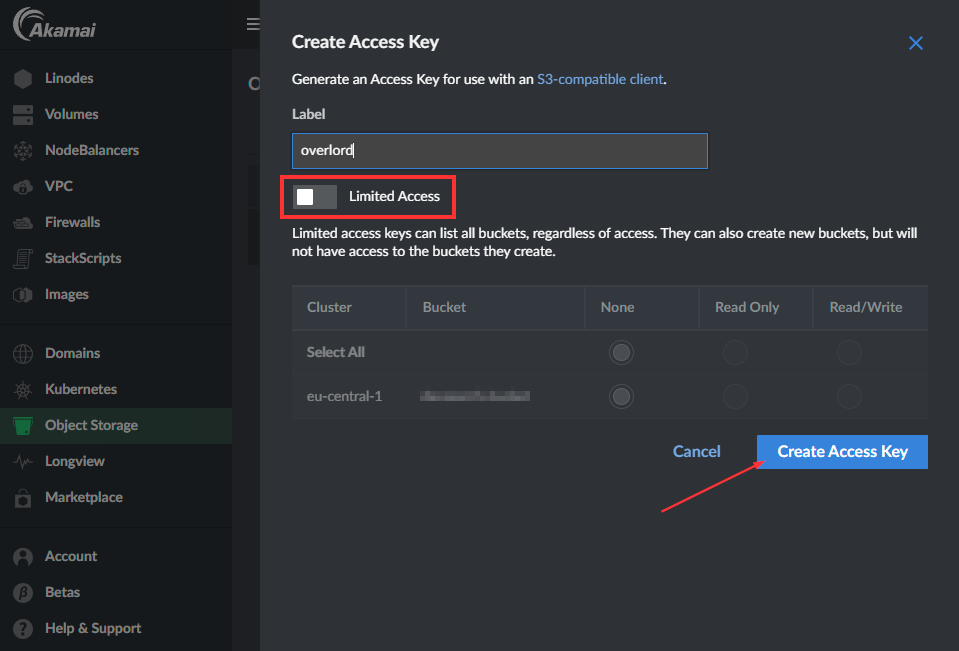
Then, create an Access Key without Limited Access. This allows the key to do anything related to permissions and enables it to do anything with all your buckets. In essence, it works like the root account on Linux systems.

Add Access Key
Note down the Key and secret in a safe place.
Now, you have done everything you need to do before you can start using s3cli for all your configuration and management needs on your Linode/Akamai S3 buckets.
Configure s3cli
Prepare the tool for use
Now it's time to configure the s3cli on your local host to manage your buckets.
NB! Practice the principle of least privilege!
Never configure s3cli with a root-level (Not Limited Access) key on a production or staging server. An attacker with a shell can use the s3cli tool to get your secret and start doing all sorts of evil.
Run this command to start the interactive configurator:
s3cmd --configureThe configuration wizard is pretty intuitive, but you must set:
- Default Region: US
- S3 Endpoint <datacenter-id>.linodeobjects.com
- DNS-style: %(bucket)s.<datacenter-id>.linodeobjects.com
The "datacenter-id" can be found here in the Akamai documentation.
NB! The configuration wizard cannot verify the credentials, so you must enter "n" on the Retry configuration prompt.
Now, you can finally start using s3cli.
Create S3 bucket
Creating a S3 bucket is pretty straightforward. The only thing to consider is that you don't have your namespace on the data center. Your bucket must have a globally unique name in that data center.
To create a bucket, run this command:
s3cmd mb s3://haxor-bucket-test
Bucket 's3://haxor-bucket-test/' created
Add bucket policy
By default, the S3 bucket permits nobody to access the files uploaded. This is very good for confidentiality and integrity but not for availability. To make the S3 bucket available to us and our application users, we must make the uploaded files available to web users.
Because we don't want anybody to be able to enumerate the uploaded files, we only want the users to access the specific files they request. Based on this, we will create a policy to only view requested objects.
Create the following JSON file:
{
    "Version": "2012-10-17",
    "Statement": [
        {
            "Effect": "Allow",
            "Principal": "*",
            "Action": [
                "s3:GetObject"
            ],
            "Resource": [
                "arn:aws:s3:::haxor-bucket-test/*"
            ]
        }
    ]
}
The version cannot be changed since this references the policy standard version, not the date the policy was created or edited.
To apply the new policy, run this command:
s3cmd setpolicy s3_bucket_policy.json s3://haxor-bucket-test
s3://haxor-bucket-test/: Policy updated
App access
If the application needs to upload files to your bucket, you should add a new S3 Access Key with write permissions to that specific bucket.
Remember never to store the access key in your git repo or hardcode it in your app. For web applications, it's common to store these as environment variables in some way.