The Honeycomb Alpha yoke and Bravo throttle quadrant are fantastic pieces of kit for flight school students and flight sim nerds on a budget.
In this article, I will list configuration tips and tricks I have learned and want to use as a reference for myself.
Alpha deadzone
How to calibrate, and get rid of the deadzone issue.
For some strange reason, every consumer-grade joystick vendor assumes their customers are 3-year-olds with no hand-eye coordination. Because of this, they tend to put a silly amount of dead zone in their sticks to compensate for twitchy movements. Honeycomb is no exception.
Follow these instructions to calibrate the yoke, so that the dead zone is almost completely removed:
Disconnect the Honeycomb Alpha from your computer. Then turn off all switches on the yoke base. Meaning have them plipped downwards. Then turn on the ALT, and BUS2 switches. Then press down both the white buttons on the left-hand side of the joke, while connecting the USB cable on the yoke to your computer. This will make the LED lighting inside the base strobe before they shine solid bright red. You now have the yoke in calibration mode.
Now you will calibrate each extreme position of the yoke, separated by a center calibration of the yoke. For each position, the LED brightness button on the back of the yoke will be used to set the position in the firmware, which will then be used to calculate the dead zone. The following positions and order should be set.
- Left (roll)
- Center
- Right (roll)
- Center
- Push (pitch)
- Center
- Pull (pitch)
- Center
After the final push of the LED brightness button, the LED lighting in the base will flash to indicate that calibration was successful. Now disconnect and reconnect the yoke to properly calibrate the dead zone.
To get the best center calibration, I would recommend letting go of the yoke in the endpoint, letting the rubber bands inside the base pull it, and then letting it center itself. This will make the yoke oscillate a bit before settling down. When it has settled, push the LED brightness button to calibrate the center. All noticeable deadzones disappeared from my yoke when calibrating the yoke with this method.
Watch this YouTube video for a video demonstration, and explanation.
Bravo elevator trim
From rotary encoder to virtual axis
The bravo throttle quadrant provides excellent value with its six analog axes and many bindable buttons. The only problem I have with the kit is how it's useable in Microsoft Flight Simulator 2022 (MSFS 2020). Because it's "just" a rotary encoder and the fact that it's not possible to adjust how many degrees of turning each pulse on the rotary encoder should be interpreted as you will have to rotate the trim wheel many rotations to change the pitch only a fraction of a degree.
The solution to making the trim wheel function in MSFS 2020 is to use a tool to make the rotary encoder pulses into a virtual axis. A great tool to achieve this is AuthentiKit in combination with a virtual joystick from vJoy.
vJoy can be downloaded from Sourceforge. Download and install it before proceeding with this guide.
Once installed, create a single vJoy with at least one slider axis. Other types of axes will not work great with MSFS, because of built-in curves in MSFS, that you cannot disable. These curves will make the trim wheel move at different speeds depending on where on the virtual axis it is.
When the vJoy is created and activated you can install AuthentiKit from its official website. Download and install it before proceeding with this guide. You will get a warning about it being unsigned software. Accept the risk and install it.
Once installed, create a "Remap Button to Virtual Axis", where you use the upward rotation button from the rotary encoder as the "Input Button +", and the downward rotation of the rotary encoder as the "Input Button -". Then as the Virtual Output Azis select the SL0 or SL1 axis on the vJoy you created earlier.
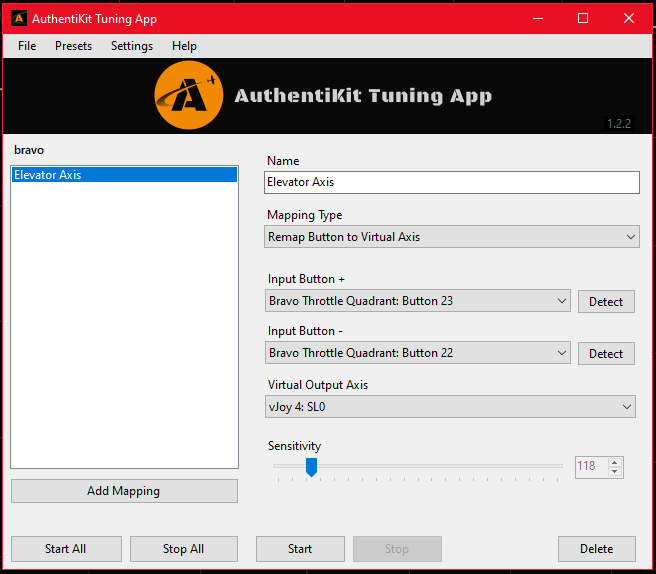
Creating a encoder to virtual axis in AuthentiKit
Start the configuration and launch MSFS 2020. In MSFS 2020, you can now bind the vJoy axis to the "Elevator trim axis (-100 to +100%)".
Start a flight and try out various sensitivities until you find one that feels natural to you. As you can see in the screenshot above, a sensitivity of about 120 felt natural to me.
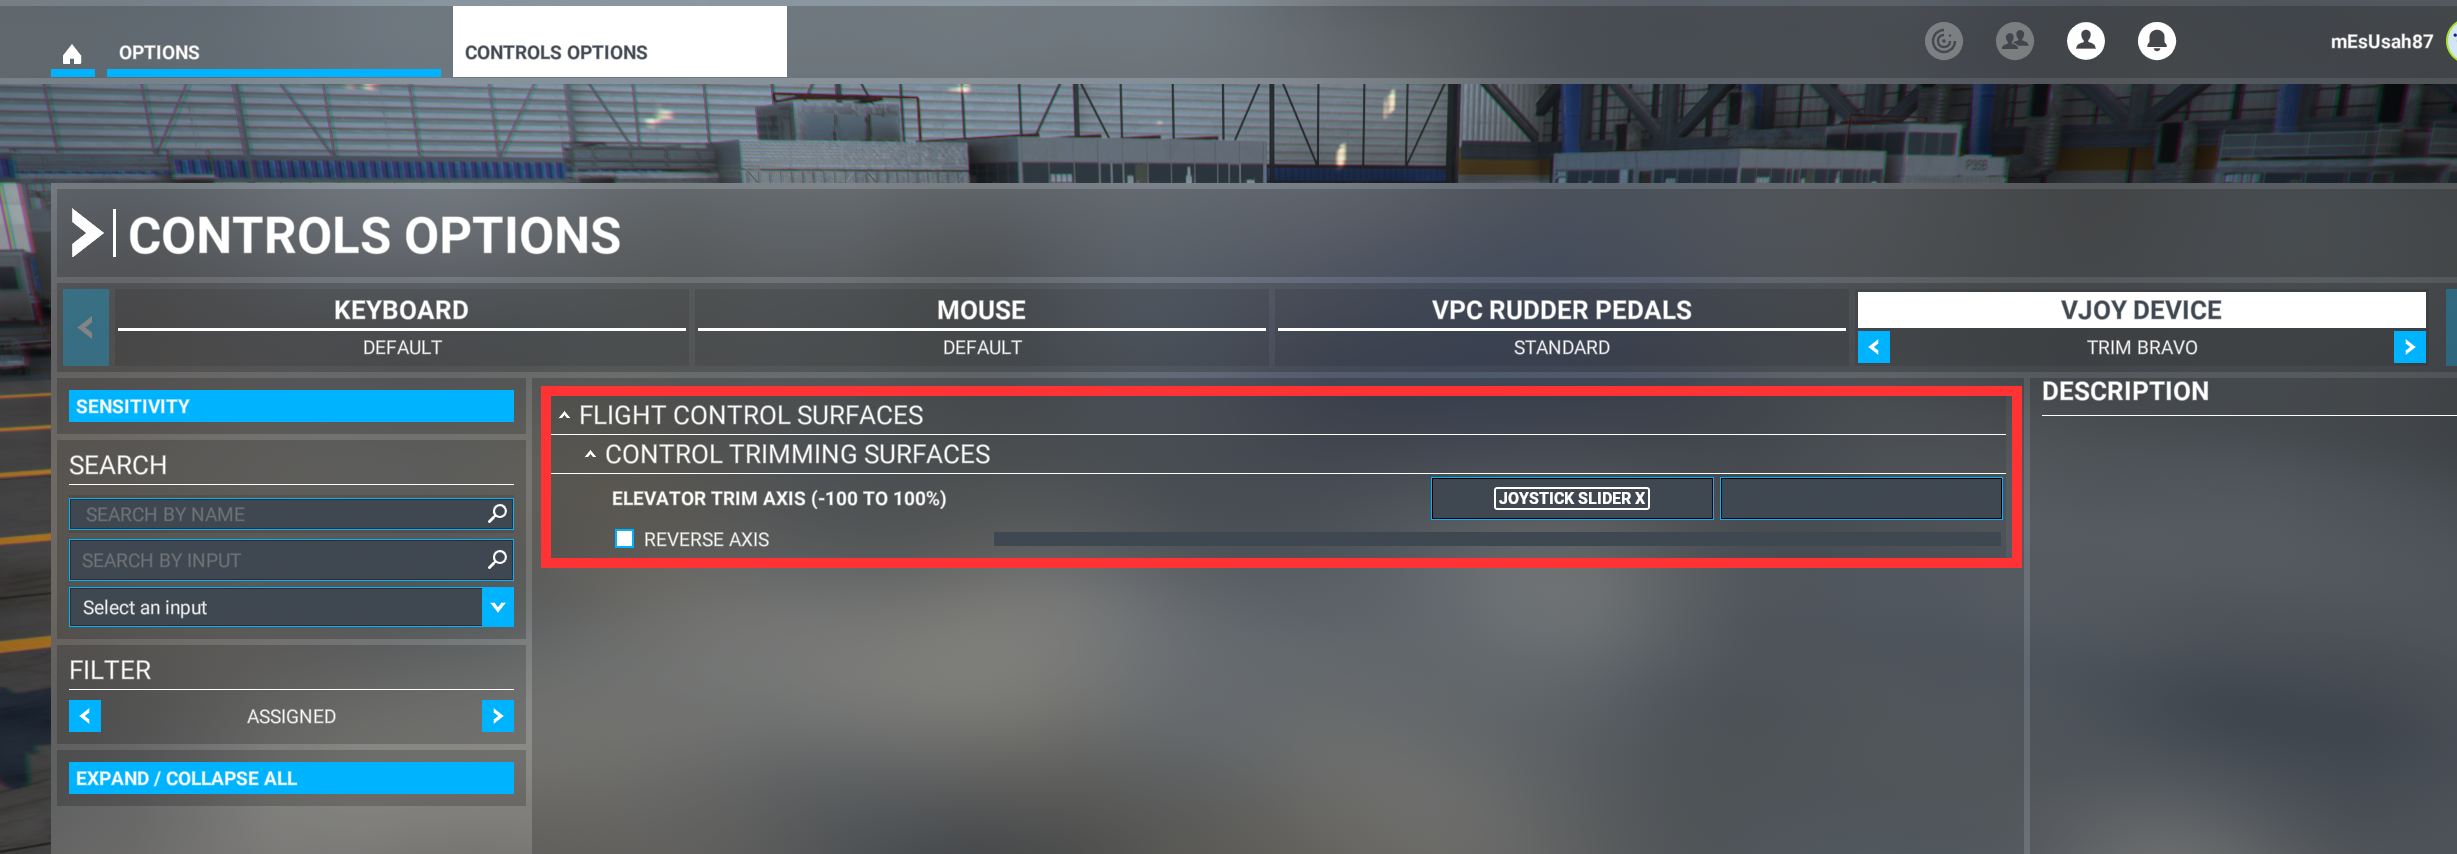
Assigning the axis to elevator trim