The Linux Terminal Server Project is an amazing tool for centralized computing. I use the old-school way of doing office computing where there is a central mainframe that does all the computing and spread around the office there are thin client computes that just have the computing power to handle the remote use of the remote mainframe.
A thin client computer is a computer that has no operating system installed. A thin client computer that is connected to the terminal server will not have anything installed on its hard drive.
When the thin client boots it will download an image from the terminal server containing the OS and other software necessary to use the terminal server for computing.
There are many reasons why this is still in the 2020s a valid way of doing computing. One of the reasons is the ease of management. Instead of having to update individual computers, you just update the mainframe, and then all the changes will propagate to all the thin clients.
In this guide, I will use VMware Workstation as a platform, but the steps can be replicated to real-world computers.
Step 1:
Install the server, and configure the network
Because the LTSP server will function as the actual computer for the thin clients it needs two NICs (Network Interface Cards). One NIC that will face the world, and one that will face the network that the thin clients connect to. The LTSP server will function as a DHCP server for the terminal server network, and therefore be able to supply the thin clients with all the info they need in order to boot from the network.
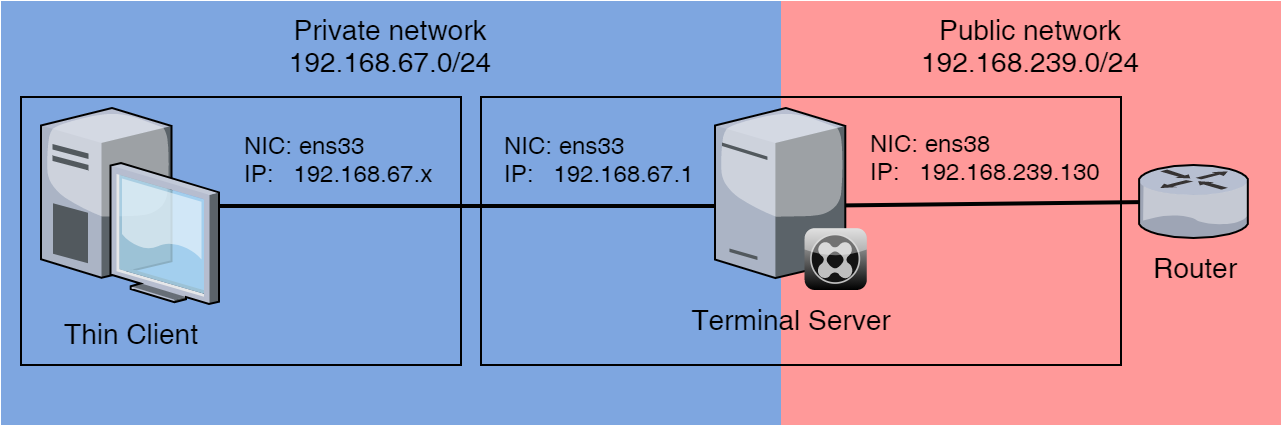
Logical topology of LTSP networks
Start by creating av VM (Virtual Machine) in VMware. That computer needs two NICs, a minimum of 4GB RAM, and a 20GB HDD.
Set the first NIC to a HOST-only network, and the second to NAT.
In VMware Workstation, open Edit, and select Virtual Network Editor. In the lower right corner, there will be a button to start "change settings" Click it and a Windows prompt will pop up since this requires administrator privileges.
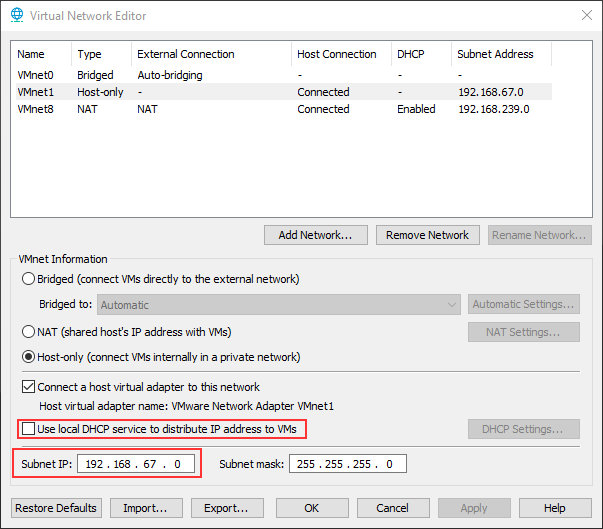
Disable the local DHCP server, and set the correct Subnet-IP
From here you disable the VMware DHCP server and set the correct Subnet IP on the host-only network.
Save the changes by clicking apply, and ok. Now you can attach the Installation image for Ubuntu 20.04 or the Linux distro of your choice. But please install a desktop Linux since this will include everything you need to get up and running quickly with LTSP.
Complete the installation, and run a complete update. When this is done you are ready for the next step
Step 2:
Network configuration on the LTSP server
Start by checking what NIC failed to get an IP address. This is the NIC that is connected to the host-only network.
ip a
1: lo: <LOOPBACK,UP,LOWER_UP> mtu 65536 qdisc noqueue state UNKNOWN group default qlen 1000
    link/loopback 00:00:00:00:00:00 brd 00:00:00:00:00:00
    inet 127.0.0.1/8 scope host lo
       valid_lft forever preferred_lft forever
    inet6 ::1/128 scope host
       valid_lft forever preferred_lft forever
2: ens33: <BROADCAST,MULTICAST,UP,LOWER_UP> mtu 1500 qdisc fq_codel state UNKNOWN group default qlen 1000
    link/ether 00:0c:29:61:d8:55 brd ff:ff:ff:ff:ff:ff
    altname enp2s1
    inet6 fe80::9ecc:e90d:865d:5abf/64 scope link noprefixroute
       valid_lft forever preferred_lft forever
3: ens38: <BROADCAST,MULTICAST,UP,LOWER_UP> mtu 1500 qdisc fq_codel state UNKNOWN group default qlen 1000
    link/ether 00:0c:29:61:d8:5f brd ff:ff:ff:ff:ff:ff
    altname enp2s6
    inet 192.168.239.130/24 brd 192.168.239.255 scope global dynamic noprefixroute ens38
       valid_lft 1649sec preferred_lft 1649sec
    inet6 fe80::c127:1f74:2e7:6a7c/64 scope link noprefixroute
       valid_lft forever preferred_lft forever
As you can see from the terminal dump above, the NIC ens33 did not get an IP address which means that this is the NIC connected to the host-only network.
The LTSP installation will recognize the NIC with the IP of 192.168.67.1/24 and auto-configure based on that NIC. Therefore the host-only NIC must be set to that IP. Since this is a server, we also want to set the NAT'ed NIC to a static IP for consistent access from the NATed network.
In most Linux distros that use network manager the config file is by default the only file within /etc/netplan/. Ta make things easy for ourselves we edit that file.
sudo nano /etc/netplan/01-network-manager-all.yamlnetwork:
ethernets:
ens38:
addresses: [192.168.239.130/24]
gateway4: 192.168.239.2
dhcp4: no
nameservers:
addresses: [8.8.8.8, 8.8.4.4]
ens33:
addresses: [192.168.67.1/24]
version: 2
renderer: NetworkManagerSave the file and exit. To enable the changes run this command.
sudo netplan applyIf this did not print any errors it means the changes got loaded. To verify the network configuration run this command:
ip a
1: lo: <LOOPBACK,UP,LOWER_UP> mtu 65536 qdisc noqueue state UNKNOWN group default qlen 1000
    link/loopback 00:00:00:00:00:00 brd 00:00:00:00:00:00
    inet 127.0.0.1/8 scope host lo
       valid_lft forever preferred_lft forever
    inet6 ::1/128 scope host
       valid_lft forever preferred_lft forever
2: ens33: <BROADCAST,MULTICAST,UP,LOWER_UP> mtu 1500 qdisc fq_codel state UNKNOWN group default qlen 1000
    link/ether 00:0c:29:61:d8:55 brd ff:ff:ff:ff:ff:ff
    altname enp2s1
    inet 192.168.67.1/24 brd 192.168.67.255 scope global noprefixroute ens33
       valid_lft forever preferred_lft forever
    inet6 fe80::20c:29ff:fe61:d855/64 scope link
       valid_lft forever preferred_lft forever
3: ens38: <BROADCAST,MULTICAST,UP,LOWER_UP> mtu 1500 qdisc fq_codel state UNKNOWN group default qlen 1000
    link/ether 00:0c:29:61:d8:5f brd ff:ff:ff:ff:ff:ff
    altname enp2s6
    inet 192.168.239.130/24 brd 192.168.239.255 scope global noprefixroute ens38
       valid_lft forever preferred_lft forever
    inet6 fe80::20c:29ff:fe61:d85f/64 scope link
       valid_lft forever preferred_lft forever
As we can see from the terminal dump above the NIC has gotten the correct settings. We are now ready to install LTSP on our server.
Step 3:
Installation and configuration of the LTSP server.
Start by installing the PPA (Personal Package Archive) for the Linux Terminal Server Project. By doing this you get the packages directly from the developers. And in my experience, you save yourself from a lot of hassle.
sudo add-apt-repository ppa:ltsp && sudo apt updateYou are now ready to install all the necessary packages for the LTSP server.
sudo apt install --install-recommends ltsp ltsp-binaries dnsmasq nfs-kernel-server openssh-server squashfs-tools ethtool net-tools epoptesAdd your administartor user to the group that is allowed to config the LTSP server. In the example below I use my own user.
sudo usermod -aG epoptes stanleyNow that all the packages are installed and the correct permissions are set we can start configuring the LTSP server.
We start by enabling the DHCP server functionality of dnsmasq. This is important. Without the DCHP server the thin clients will not know where to find the LTSP server on the network.
sudo ltsp dnsmasq --proxy-dhcp=0Now we must create the boot image that will be distributed on the network.
sudo ltsp image /This may take a couple of minutes because it will create an image of the OS on the LTSP server. There are many ways to do this. But by creating an image of the entire server we can easily manage what software the thin clients can use by just installing and configuring things the way we want them to be on that server. All these changes will apply to the thin clients.
NOTE: Some installations of LTSP has issues with the way the filesystem is spread out on various partitions. If you have a boot partition you might have to do some workarounds to get a successful build of the image. See this github issue for more info.
There are options to use virtual machine images, chroot ++, but in this guide, we keep it simple to get you up and running.
Next, we will create the iPXE image and set up a network file share to make it possible for the clients to download the image at boot.
sudo ltsp ipxe
sudo ltsp nfs
sudo ltsp initrd
Next we create the users that is allowed to access the LTSP server via their thin clients.
sudo useradd -m willy
sudo useradd -m wonka
sudo ltsp initrd
It's important to remember that every time you make changes to the image that is accessible from the thin client you have to rerun "ltsp initrd" as you can see in the last line of the terminal dump. So, if you install new software or add a new user "ltsp initrd" must be run to update the image.
Step 4:
Setup thin clients
Now that the LTSP server is up and running all you need is to do is attach a computer to the host-only network, and configure the thin clients to boot from the network. To make a thin client VM boot from network you must edit the setting in the BIOS settings menu.
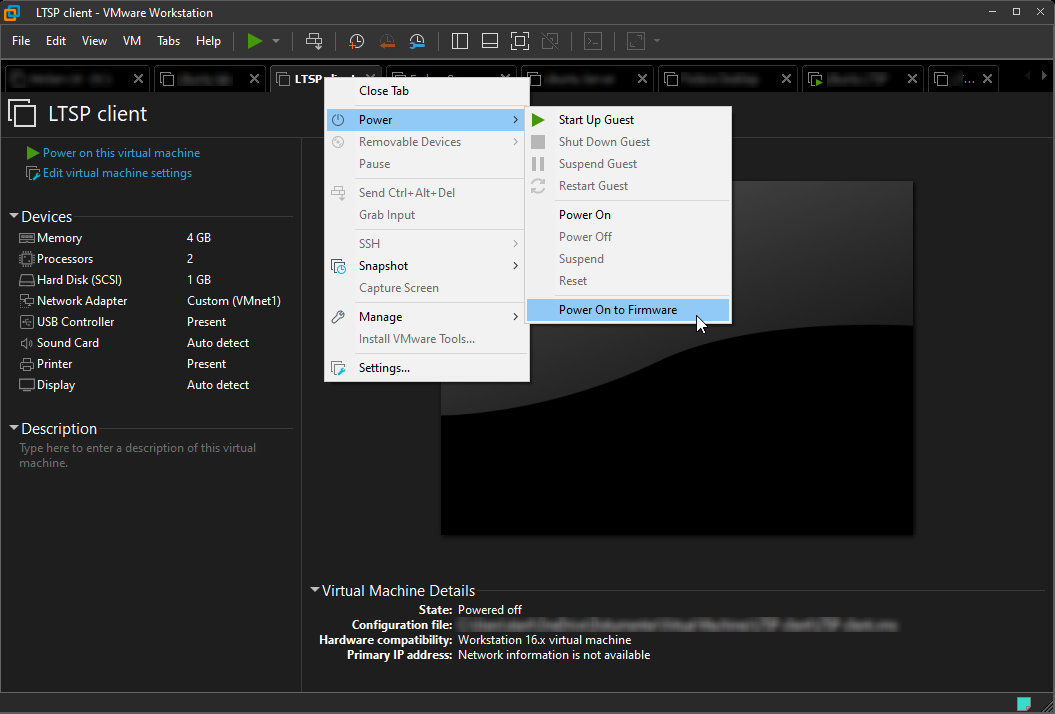
To access the BIOS settings, you must "Power On to Firmware"
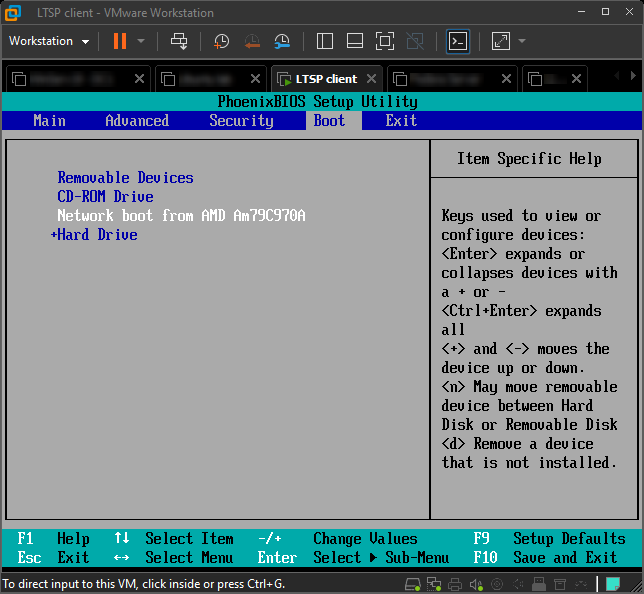
Set the boot order so that it will try to boot from network before the HDD
Now you can save the changes and boot the thin client.
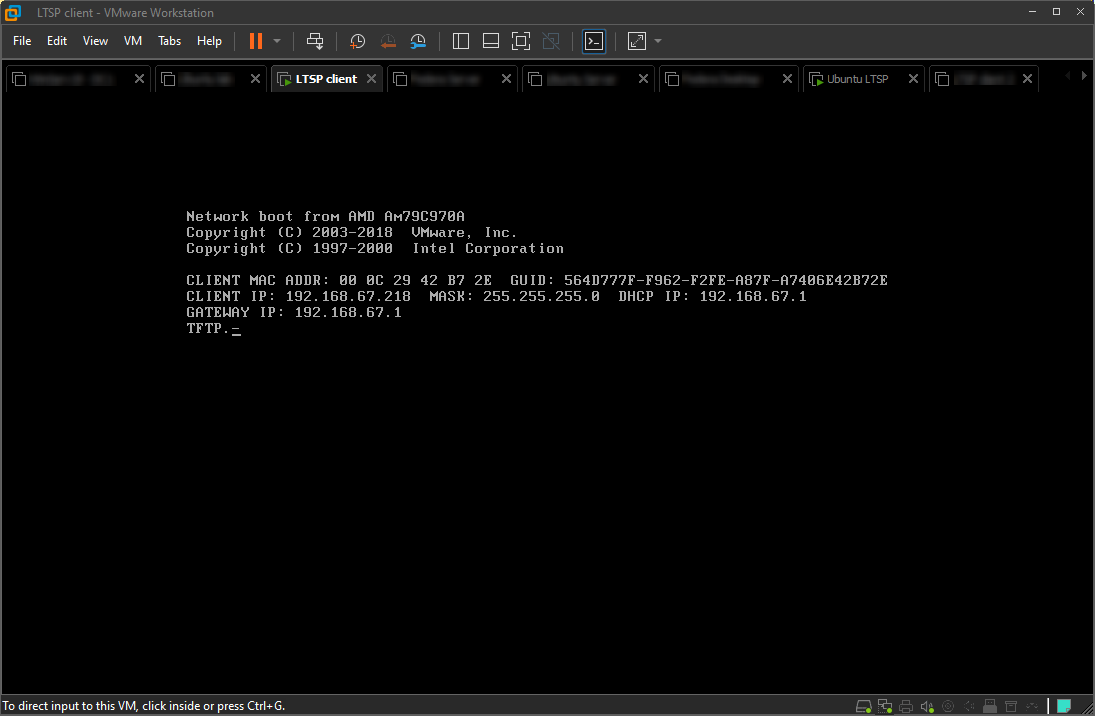
Booting from network
With VMware Workstation it might take a while before the network boot will ask the DHCP server for configurations. In my experience, it can take from 5 to 10 minutes. But when it gets the DHCP configuration it will load the OS over the network quickly, and you will be greeted with the login screen.
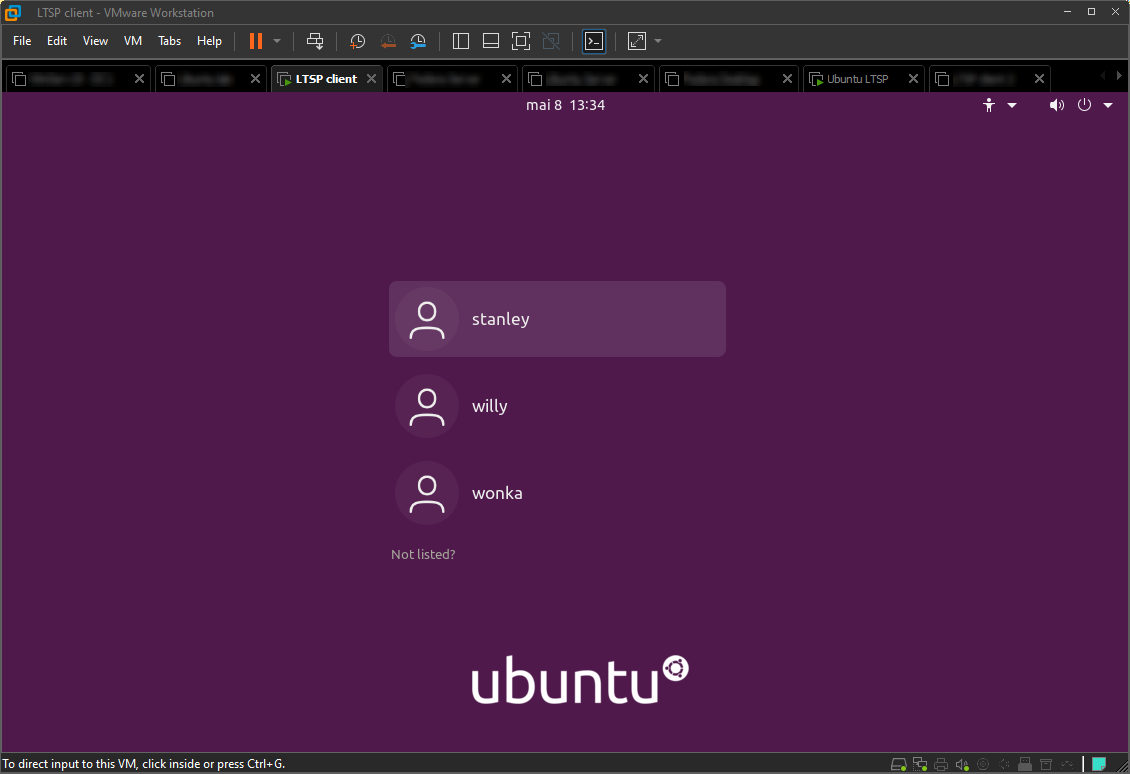
The ubuntu login screen from the thin client.
Congratulations! You now have a functioning Terminal server solution based on Linux!